San Jose businesses tend to think about doors only when something breaks, until an inspector, fire marshal, or a customer using a mobility device forces the issue. Exits, entry doors, and back-of-house egress routes are among the most regulated parts of any commercial space. This guide covers what generally counts as ADA-friendly door hardware, when panic exit hardware is typically required, and common mistakes to avoid -- but final code compliance for your specific building is always confirmed with your local building department or fire marshal, not decided from an article.
San Jose sits at the intersection of busy retail corridors, mixed-use buildings, older tenant improvements, and constant remodel activity. That combination creates a common problem: doors that "sort of work" for most people but fall short of accessibility rules or egress requirements. Getting your door hardware right helps reduce barriers for customers and employees with disabilities, avoid costly rework during inspections or build-outs, improve emergency egress performance, and support smoother traffic flow in high-use spaces like cafes, clinics, offices, and schools. If your occupancy type requires panic exit hardware, the wrong device, or the right device installed incorrectly, can create a real life-safety issue.
Accessibility rules aren't just about ramps and restroom grab bars -- doors are one of the biggest friction points in real-world accessibility. In practical terms, accessible door hardware should be easy to locate, easy to grasp, and easy to operate with one hand, without tight pinching, twisting, or strong grip force. Commonly referenced practical elements include lever handles (or other accessible operating hardware) rather than round knobs, clearances that let a user operate hardware without scraping knuckles or getting blocked by trim, reasonable opening force where required, and hardware placed at usable heights positioned to avoid awkward reach. Contractors often reference the ANSI A117.1 accessibility standard alongside building code and ADA expectations -- your specific requirements should be confirmed for your building and occupancy type.
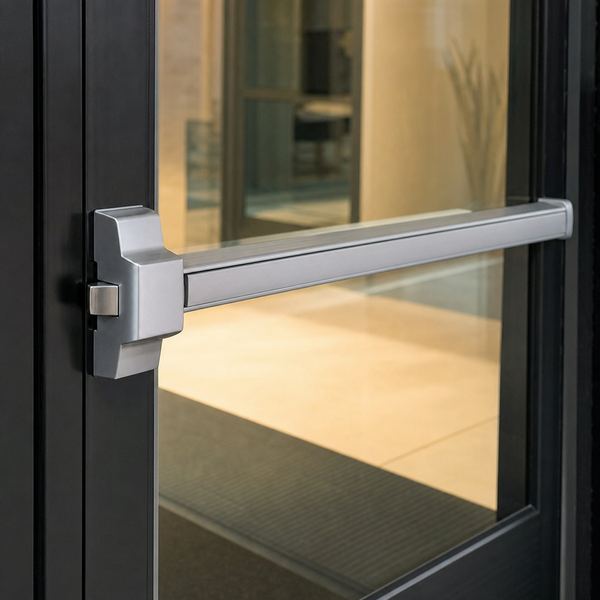
Panic hardware isn't only about exiting quickly -- it also affects usability for people with limited strength or dexterity. Well-selected ADA-compliant panic bars typically share a few characteristics: a push surface that can be activated with the hand, forearm, or body; minimal operational complexity with no multi-step motions; proper mounting so the bar is reachable and functions smoothly; and no add-on locks or secondary latches that make the device hard to operate. The same features that help in an emergency often help with everyday accessibility, as long as they aren't undermined by poor hardware choices or field modifications.
Not every exit door needs panic hardware, but when it's required, it isn't optional. Requirements commonly depend on occupancy type (such as assembly, education, or certain retail uses), occupant load, and whether the door is part of a required egress path. If you're reconfiguring a floor plan, changing use, or increasing occupant load, you may trigger a requirement for panic exit hardware even if the previous tenant didn't have it. If you're taking over a space, don't assume the existing devices match your new use -- confirm requirements during planning, before you order doors, frames, and hardware.
You may see panic hardware referenced as UL listed, indicating it has been evaluated to a recognized safety standard for panic exit devices. That matters for life-safety confidence and for approvals. When comparing devices, it's worth asking whether the specific model is listed (not just the brand), whether the listing is current for that series, and whether the planned installation matches the listing conditions -- this is especially important for high-traffic exits, public-facing storefronts, and doors that are part of a required means of egress.
A common San Jose scenario is a glass or aluminum storefront system with a rear exit through a rated corridor or tenant separation wall. If the opening is fire-rated, hardware choices need real care. Rated assemblies can involve specific latch configurations, compatible strikes, approved door and frame labels, and limitations on field modifications like drilling, cutting, or adding electrified components. If your door has a fire label, treat hardware changes as a coordinated system decision involving the door, frame, hardware, and an experienced installer, rather than a simple swap.
Whether you're improving access proactively or responding to a notice, many upgrades are straightforward once you pick the right components: replacing round knobs with levers, adjusting closer speed and backcheck so doors don't slam or require excessive force, replacing worn hinges, misaligned strikes, or dragging thresholds that make doors hard to open, and swapping outdated devices for modern panic hardware that operates smoothly. These are contained retrofit projects that can improve usability immediately.
Lever handles are popular because they're generally easier to use than knobs, but installation details still matter. Clearance issues show up when the lever sits too close to a jamb, sidelight frame, or glass stop, when decorative trim blocks hand access, when the lever "returns" into an obstruction and becomes difficult to grip, or when the latch doesn't retract smoothly, forcing extra torque. As a practical rule, choose levers with shapes and roses or escutcheons that leave enough room for a hand to engage the lever without scraping or pinching, which matters especially on the narrow stile aluminum doors common in retail.
Even with good hardware, a door that's too heavy or a closer that's cranked down too tight can be a real barrier. If a door is difficult to open, don't assume the door itself is simply "heavy" -- often the real culprit is closer adjustment (sweep speed, latch speed, backcheck), a misaligned latch or strike causing binding, a warped door or sagging hinges, or weatherstripping that's too aggressive for the application. Having a technician measure and diagnose instead of guessing can make a noticeable difference in accessibility and reduce wear on the hardware over time.
People use these terms loosely. A panic bar typically refers to a crossbar-style device that spans the door, while a push pad (touchpad-style exit device) uses a wider, flatter paddle common in modern installations. Both can be appropriate depending on door type, aesthetics, abuse resistance, and ease of use -- in many modern commercial interiors, touchpad devices are popular for being intuitive and having fewer protruding parts. From an accessibility standpoint, what matters most is smooth, single-motion operation and proper mounting, not just the style.
Exit device options can feel endless: rim, mortise, vertical rod, concealed, surface, electrified, delayed egress, dogging, trim, cylinders, and more. A practical approach starts with the door and frame reality (aluminum storefront, hollow metal, or wood; single door or pairs; any mullions or narrow stile constraints), then identifies egress and security needs (is this a required exit, is free egress needed at all times, is controlled entry from outside needed), then checks for fire-rating and special conditions (rated opening, stairwell re-entry requirements, planned access control integration), and finally chooses the device type that fits -- rim devices are common and cost-effective on many single doors, vertical rod devices are common on pairs needing top and bottom latching, and mortise devices can be elegant but require careful door prep and compatibility checks. The whole system, including the exit device, trim, cylinder, closer, and latch and strike alignment, needs to work together -- a great device installed poorly still performs poorly.
Quality installation is less about "mount it and go" and more about alignment, measurement, and code-aware finishing. A thorough installer typically confirms door swing, handing, and clearances before drilling, checks for sag, hinge wear, and frame issues that would cause latch binding, uses correct templates and prep to avoid weakening the door, aligns strikes precisely to prevent sticking and premature wear, tests repeated operation rather than a single cycle, and adjusts the door closer so it closes securely without slamming. It's reasonable to ask for functional testing before the crew leaves -- open and close cycles, a latch engagement check, and a quick review of any access control or alarm interfaces.
You don't need to be an expert to catch obvious red flags. Periodically check whether the door opens freely in the direction of egress where required, whether the panic device releases with one smooth motion, whether the push surface is unobstructed (no straps, tape, or signage blocking it), whether the door re-latches every time without needing a shoulder shove, whether any deadbolts or slide bolts have been added, whether the closer is working and adjusted so the door doesn't slam or drift, whether fasteners are tight with no wobble, and whether the threshold transition is smooth and not a trip hazard. If you find recurring failures, that usually points to misalignment, door or frame movement, or the wrong device for the opening -- not something to fix by repeatedly tightening screws.
Many accessibility problems come from well-intended quick fixes that unintentionally create barriers: installing knobs instead of levers on accessible routes, adding secondary locks that require tight pinching, twisting, or two-step operation, leaving closers set too strong after painting or weatherstripping changes, misaligned latches that force users to wiggle the handle, hardware placed where trim or glass frames block hand access, thresholds or mats that create drag, and temporary wedges, chains, or improvised hold-opens on exit doors (a practice that should be avoided entirely, since propping open a required exit or fire door defeats its purpose). Planning the full opening -- hardware, closer, seals, and alignment together -- tends to work better than swapping only the handle.
San Jose Locksmith is licensed under California Locksmith License LCO 6739 (BSIS) and installs panic bar hardware and commercial door hardware as part of our regular commercial locksmith work. We're open Sunday through Thursday 9 AM to 9 PM and Friday 9 AM to 5 PM (closed Saturday). For final code compliance sign-off, always confirm requirements with your local building department or fire marshal for your specific occupancy.
What makes door hardware ADA-compliant?
Accessible door hardware should be easy to locate, easy to grasp, and easy to operate with one hand, without tight pinching, twisting, or strong grip force. In practice this usually means lever handles instead of round knobs, adequate clearance to avoid scraping knuckles, and hardware placed at a usable height.
Does every commercial exit door need panic hardware?
No. Whether panic hardware is required generally depends on occupancy type, occupant load, and whether the door is part of a required egress path. If you're changing use, reconfiguring a floor plan, or increasing occupant load, it's worth confirming requirements before you order doors and hardware, since a prior tenant's setup may not match your new use.
What's the difference between a panic bar and a push pad?
A panic bar typically refers to a crossbar-style device that spans the door, while a push pad (or touchpad) uses a wider, flatter paddle that's common in modern installations. Both can be appropriate depending on the door type and aesthetics -- what matters most for accessibility is smooth, single-motion operation and correct mounting.
Can I install panic hardware on a fire-rated door myself?
It isn't recommended. Fire-rated openings involve specific latch configurations, compatible strikes, and approved door and frame labels, and field modifications like drilling or cutting can invalidate the rating. Hardware changes on a rated opening should be treated as a coordinated decision involving the door, frame, and hardware together, ideally with an experienced installer.
Last updated: August 2026